Do you need help on a specific subject? Use the contact form (Request a blog entry) on the right hand side.

2015-06-20

SwifterJSON version 0.9.1

A quick note to mention that I updated my JSON framework from version 0.9.0 to 0.9.1.
As can be seen from the small increment, these are mostly cosmetic changes. Functionally nothing has changed.
All changes make the interface more consistent, and make the framework easier to adopt in other projects.

Link to github: SwifterJSON

Happy coding...

Did this help?, then please help out a small independent.
If you decide that you want to make a small donation, you can do so by clicking this
link: a cup of coffee ($2) or use the popup on the right hand side for different amounts.
Payments will be processed by PayPal, receiver will be sales at balancingrock dot nl
Bitcoins will be gladly accepted at: 1GacSREBxPy1yskLMc9de2nofNv2SNdwqH

We don't get the world we wish for... we get the world we pay for.

2015-06-19

Adding Apple help to an OS-X application

So this is not Swift related, but it is something many of us will encounter eventually: How to add Apple Help support to an application

I spend a full day trying to get this to work, and I failed. The document from Apple has errors in it, and there is precious little to find elsewhere on the inet. Though I did find one interesting blog entry on this here: Apple help in 2015. Unfortunately the hints and tips provided there also failed to work for me.

I did in fact give up after that. I took the alternative approach: connect the help menu to the AppDelegate and handle the help by opening up a html file that is located in the resources. Like this:

    @IBAction func displayHelp(sender: AnyObject?) {
        
        let url = NSBundle.mainBundle().URLForResource("help", withExtension: "html")
        
        NSWorkspace.sharedWorkspace().openURL(url!)

    }

Of course that worked... but it irked me. Why would the "normal" approach not work?

What I wanted was the most simple implementation that I could think of, no multi language support, no icon, no special features, no index file etc. Just a simple title with a few topics. I figured that when I can get that to work, the rest is a matter of legwork.

And then I had some luck... well, at least it finally started to make some sense after I read up on the Core Foundation Keys. With a little experimenting I finally had my first success.

Here is how it works for me:

First create the content, I created one main file (MyAppHelp.html) and a couple of topic files (Topic1.html, Topic2.html etc). The MyAppHelp.html linked to the Topic files in the usual way (<a href...)

In the MyAppHelp.html file I did not include anything special, no meta tags. Specifically no "AppleTitle" tag and no "Robots" tag. Just plain html content with links to the topic pages.

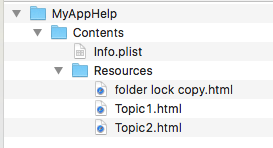
Next I created the folder hierarchy for the help book on my desktop and placed the html files in the Resources folder.


We need one more file, a property list. I simply copied a Info.plist from another app's help bundle and modified its content as follows:


The key's InfoDictionary version, Bundle OS Type code, Bundle creator OS Type code and HPDBookType should be exactly as above.

The HPDBookAccessPath should be the name of the top level html file. I think that if you put it in a subdirectory (e.g. English/MyAppHelp.html) the name of the subdirectory should be included, but in my example here just the name is sufficient.

The HPDBookTitle is important, it is used in the Info.plist of your application to identify the help book.

The Info.plist just created should reside at the Contents level of the help book hierarchy. The complete help book looks as follows:


Now rename the help book to create a bundle: MyAppHelp becomes MyAppHelp.help. When we do this, the icon changes to the Apple helpbook icon, and we can no longer simply open the folder. Remember that with Right-Click -> Show Package Contents we can still see what is inside.

Note: Even though the icon changed, this does not mean that we can double-click the help book to open it. That won't work. But it will work from within the application...

Now switch to the project in xcode. In Xcode select "Add Files" and choose the help book just created. Make sure that the files and folder structure is copied:


Almost done...
Now edit the Info.plist of the project to include the following two key's:


Forget about the "Help Book File" key, we don't need that.
It should be noted that the Help Book Identifier must have the same value as the HPDBookTitle from the help book Info.plist file. The Help Book directory name key is the name of the help book file that we added to the project.

That is it, launch the application and select "Help -> MyApp Help" from the menu. Voila!

PS: A neat trick is to create an alias into the Resources folder of the help book and place that somewhere at the top level of the project. Use that alias to quickly access the html files for updating etc. Also, most HTML editors will be unable to open a bundle, but they can follow an alias. Unfortunately Xcode will not see the modifications you make to the help book, but git will. So if you use git, the changes to the help book will be put in the repository, even if Xcode does not show the "M" behind the help book.

Happy coding...

Did this help?, then please help out a small independent.
If you decide that you want to make a small donation, you can do so by clicking this
link: a cup of coffee ($2) or use the popup on the right hand side for different amounts.
Payments will be processed by PayPal, receiver will be sales at balancingrock dot nl
Bitcoins will be gladly accepted at: 1GacSREBxPy1yskLMc9de2nofNv2SNdwqH

We don't get the world we wish for... we get the world we pay for.

2015-06-17

Using Drag & Drop with custom types from Swift

I wanted to use Drag & Drop from within my own application for my own custom types. I already have implemented drag & drop for sources outside my application as I have blogged about in this post. In another post I have documented the use of the pasteboard from within Swift.

So adding drag & drop when the source and destination are my own app should be easy right?

Well, no. I did not find this easy at all. But I did get it to work :)

First things first: The apple documentation (that I could find) is of little to no help at all. It is either outdated or it laks guidance. Besides, I must be the only one having trouble with this because there is almost nothing to find on the inet ... well, there is, but it is also outdated...

Ok, here is the deal:

First decide which type to drag & drop. For that type the NSPasteboardWriting and NSPasteboardReading protocols have to be adopted. Oh, and that type (class) must inherit from NSObject as well.

Like this:

class MyData: NSObject, NSPasteboardWriting, NSPasteboardReading {
    
    var eData: String!
    var oData: String!    
    
    init(e: String, o: String) {
        super.init() // Necessary for NSObject
        oData = o
        eData = e
    }
        
    private func jsonString() -> String {
        let top = SwifterJSON.createJSONHierarchy()
        top["eData"].stringValue = eData
        top["oData"].stringValue = oData
        return top.description
    }
        
    
    // MARK: - Pasteboard Writing Protocol
    
    @objc func writableTypesForPasteboard(pasteboard: NSPasteboard!) -> [AnyObject]! {
        return ["com.mycompany.MyApp.MyData"]
    }
    
    @objc func pasteboardPropertyListForType(type: String!) -> AnyObject! {
        return jsonString()
    }
    
    
    // MARK: - Pasteboard Reading Protocol
    
    init!(pasteboardPropertyList propertyList: AnyObject!, ofType type: String!) {
        
        super.init()

        if let jsonString = propertyList as? String {
            
            let (topOrNil, errorOrNil) = SwifterJSON.createJsonHierarchyFromString(jsonString)
            
            if let top = topOrNil {
                oData = top["oData"].stringValue ?? "Error"
                eData = top["eData"].stringValue ?? "Error"
            } else {
                return nil
            }
            
        } else {
            return nil
        }
    }

    static func readableTypesForPasteboard(pasteboard: NSPasteboard!) -> [AnyObject]! {
        return ["com.mycompany.MyApp.MyData"]
    }
    
    static func readingOptionsForType(type: String!, pasteboard: NSPasteboard!) -> NSPasteboardReadingOptions {
        return NSPasteboardReadingOptions.AsString
    }

}

In the above code I used my own SwifterJSON framework to encode and decode the data of MyData. If you would like to take a look at that, find the link on the left hand side of this blog.
Normally the propertyList in the pasteboard reading protocol will deliver NSData objects, but since I know that there will be a JSON string in there, I have also supplied the optional readingOptionsForType method so that the propertyList will be readable as a String when the init is called.
PS I have ignored error handling in init for brevity.

With the above code in place, we can now create MyData objects from the pasteboard like this:

    func performDragOperation(sender: NSDraggingInfo) -> Bool {
        
        
        // Get the pasteboard
        
        if let pboard = sender.draggingPasteboard() {
        
        
            // Get the Y coordinate for the drop
            
            let dropCoordinate = sender.draggingLocation()
            
            
            // Check if the drop position is within any of our subviews.
            
            if !pointIsInADocumentView(dropCoordinate) { return false }
            
            
            // Offset the Y coordinate
            
            let dropPoint = theView.convertPoint(dropCoordinate, toView: aSubView)
            
            
            // Get the index for the drop
            
            let dropIndex = lineIndexFromYCoordinate(dropPoint.y)
            
            
            // Make sure that there are filenames in the pasteboard
            
            if pboard.availableTypeFromArray([NSFilenamesPboardType]) == NSFilenamesPboardType {
                
                
                // Get the filenames from the pasteboard
                
                let files = filesFromPboard(pboard)
                
                
                // Add the filenames to the datasource
                
                insertLines(files, atIndex: dropIndex)
                
                
                // Update the view
                
                theView.needsDisplay = true
                
                
                // The drop was accepted
                
                return true
            
            } else if pboard.availableTypeFromArray(["com.mycompany.MyApp.MyData"]) == "com.mycompany.MyApp.MyData" {
                
             
                if var specs = pboard.readObjectsForClasses([MyData.self], options: nil) as? Array<MyData> {

                    dataModel.insertLines(fileSpecs, atIndex: dropIndex)
                        
                } else {
                    log.atLevelError(id: 0, source: "performDragOperation", message: "Could not read MyData from pasteboard")
                }

                // The drop was accepted
                
                return true
            }
        }
        
        // Still here, then something went wrong. The drop is not accepted.
        
        return false

    }


The yellowish underlaid code is the important bit. I have left some of the older code in so that you see how this could all work together. Refer to the blogs I mentioned at the top to see more on that. You can find a link to the logging framework I use to the left of this blog. (Note: I always accept the drop, this is my own data type, so I better make sure all errors are fixed before shipping!)

Oh, lest I forget, we also need to register ourselves to receive the new type of drop: in awakeFromNb I added the following:

        // Add drag and drop support
        

        registerForDraggedTypes([NSFilenamesPboardType, "com.mycompany.MyApp.MyData"])

With this code in place we can accept drops for our own custom data on a pasteboard. All that is left is to provide for a source that generates the pasteboard information. I had to do this in a view, but it can also be done in a window (so I believe...). In my custom NSView child I added the dragging source protocol:

class MyView: NSView, NSDraggingSource {...

The only method that I needed was:

    func draggingSession(session: NSDraggingSession, sourceOperationMaskForDraggingContext context: NSDraggingContext) -> NSDragOperation {
                
        switch context {
        case .OutsideApplication: return .None
        case .WithinApplication: return .Move
        }

    }

In this method I make clear that the drag & drop for the session that this view will begin is only available for internal drag & drop's. The data cannot be exported (dropped) outside my app.

To begin the drag & drop I added the following code to the mouseDown method:

    override func mouseDown(theEvent: NSEvent) {        
        
        // Get the mouse position from the event position
        
        let mp = convertPoint(theEvent.locationInWindow, fromView: nil)
        
        if (mp.x >= 0.0) && (mp.y >= 0.0) && (mp.x <= frame.width) && (mp.y <= frame.height) {
            
            let mousePosition = CGPointMake(mp.x - MARGIN_BEFORE_LINE, mp.y)

            // If the option key is down as well, this will be a drag & drop
                
            if theEvent.modifierFlags.isSet(.AlternateKeyMask) {
                
                // Find out if the mouse is down in a selection
                
                let lineIndex = lineIndexFromYCoordinate(mousePosition.y)
                
                if lineIndex >= dataSource.nofLines { return } // Ignore if the mouse down position is outside any of the lines
                
                let line = dataSource.lineAtIndex(lineIndex)
                
                let charIndex = line.indexForOffset(mousePosition.x)
                
                let lines = dataSource.linesInBlokSelect(lineIndex, charIndex: charIndex, lineSource: dataSource.lineAtIndex)
                
                var dragItems = Array<NSDraggingItem>()
                for l in lines { dragItems.append(NSDraggingItem(pasteboardWriter: l)) }
                
                beginDraggingSessionWithItems(dragItems, event: theEvent, source: self)
                
                // Remove the original data from the datamodel
                
                for l in lines { dataSource.removeLine(l) }
                
            } else {
                
                // Normal mouse down
                
                mouseDownPosition = mousePosition
            }
                
        } else {
            
            return
        }

    }

The salient point is the code with the yellowish background. All the other code is only necessary for my application. beginDraggingSessionWithItems is the code that starts the drag operation. But it needs an array of NSDraggingItem(s). Thus the MyData objects are wrapped in a NSDraggingItem  The NSDraggingItem can only wrap objects that implement the NSPasteboardWriting protocol.

While the above should get you up and running, it is not complete. You will probably want to add visual indicators of your own making to the drag & drop. This can be done (so I understand) through the NSDraggingItem

Happy coding...

Did this help?, then please help out a small independent.
If you decide that you want to make a small donation, you can do so by clicking this
link: a cup of coffee ($2) or use the popup on the right hand side for different amounts.
Payments will be processed by PayPal, receiver will be sales at balancingrock dot nl
Bitcoins will be gladly accepted at: 1GacSREBxPy1yskLMc9de2nofNv2SNdwqH

We don't get the world we wish for... we get the world we pay for.

2015-06-14

Code Sample: Using NSRegularExpression from Swift

Regular expressions, love them or hate them but sometimes we just have to use them.

I found myself in the situation that I had to iterate over a Swift-String using a regex expression, and then had to execute a bit of code on the characters that were found.

Luckily Apple has implemented the NSRegularExpression class so we don't have to roll our own.
And that class offers the enumerateMatchesInString operator that will repeatedly call a routine of our own with as input the range of string that satisfies the regex.

In code this looks as follows:

if let regex = NSRegularExpression(pattern: str, options: NSRegularExpressionOptions.allZeros, error: nil) {
    var maxLoopCount: Int = 0
    var range = NSMakeRange(0, count(line))
    regex.enumerateMatchesInString(
        line,
        options: NSMatchingOptions.allZeros,
        range: range,
        usingBlock: {
            [unowned self] (textCheckingResult, matchingFlags, stop) -> Void in
            if textCheckingResult.range.length > 0 {
                let start = advance(self.line.startIndex, textCheckingResult.range.location)
                let end = advance(start, textCheckingResult.range.length - 1)
                for i in start ... end {
                    // ... process result of regex
                }
            }
            maxLoopCount += 1
            if maxLoopCount > 100 { stop.memory = true }
        }
    )
} else {
    // ... there is an error in the regex expression
}

The "str" parameter contains the regex expression, it is a Swift String.
The "line" variable refers to the Swift String that must be parsed by the regex.
In the first line, the regex object is created. I did not use the error info because the result of the creation is simply "nil" when there is an error in the regex expression.
The maxLoopCount is a protection against endless loops, can be omitted at your own risk....
Before calling the enumerateMatchesInString it is necessary to create an NSRange that specifies the range of line that must be parsed. A Swift Range won't do.
The "usingBlock" closure has one special parameter, the "UnsafeMutablePointer<ObjCBool>" which might cause some head-scratching. This is a variable that is created and allocated by the enumerateMatchesInString method, hence it is available to the closure through a pointer. Within the closure it can be used to signal back to the enumerateMatchesInString method that it should stop processing. In the example above it is used as a protection against endless loops. (Necessary or not...)
The closure itself can be called for zero length ranges, hence the protection against it as the first test in the closure. Without this protection the "advance(start, textCheckingResult.range.length - 1)" would create a crash.

Happy coding...

Did this help?, then please help out a small independent.
If you decide that you want to make a small donation, you can do so by clicking this
link: a cup of coffee ($2) or use the popup on the right hand side for different amounts.
Payments will be processed by PayPal, receiver will be sales at balancingrock dot nl
Bitcoins will be gladly accepted at: 1GacSREBxPy1yskLMc9de2nofNv2SNdwqH

We don't get the world we wish for... we get the world we pay for.
2015-06-12

Final, Private and optimization

I just saw the WWDC video "Optimizing Swift Performance".

A very useful video for all software developers (that use Swift).

As a software engineer I create software solutions. In order to do that to my best ability, I have taken a liking to "Software Engineering" as a discipline. I.e. how to write good software. Using information hiding, decoupling etc, all these kind of things. Given this background I think I can be forgiven that I assumed that the "Final" and "Private" were in fact tools to help the software engineer.

Hmm, I could not have been more wrong.

After looking at the video, I think you will agree: "Final" and "Private" are meant to allow the compiler to optimize.

Sure they have some meaning for the engineer as well, but all in all? no they are optimizer switches!

Btw: I used "Final" on a class that is the basis of my recent app and that will not be subclassed. The speed improvement was substantial!

There is more in the video, but I for me will use "final" and "private" wherever I can...

Happy coding....

Did this help?, then please help out a small independent.
If you decide that you want to make a small donation, you can do so by clicking this
link: a cup of coffee ($2) or use the popup on the right hand side for different amounts.
Payments will be processed by PayPal, receiver will be sales at balancingrock dot nl
Bitcoins will be gladly accepted at: 1GacSREBxPy1yskLMc9de2nofNv2SNdwqH

We don't get the world we wish for... we get the world we pay for.

2015-06-10

Swift 2: First impression

After looking at this video "what's new in Swift 2" I have two observations:

1) Swift 2 alleviates some of the "problems" in Swift 1 and 1.2. It looks great, and I cannot wait to start using it.

2) Swift now becomes more of an "expert" tool. The introduction of new language features, however great they are, also means that writing good Swift programs has become more difficult. The learning curve has become steeper. This is something that I both regret and at the same time don't because as a software engineer I will now get a better tool to do my job.

Happy coding...


Did this help?, then please help out a small independent.
If you decide that you want to make a small donation, you can do so by clicking this
link: a cup of coffee ($2) or use the popup on the right hand side for different amounts.
Payments will be processed by PayPal, receiver will be sales at balancingrock dot nl
Bitcoins will be gladly accepted at: 1GacSREBxPy1yskLMc9de2nofNv2SNdwqH

We don't get the world we wish for... we get the world we pay for.

2015-06-04

Swift Code Library: Merged Notifications

I don't know about you, but I often find that I need to stop sending a notification for a certain duration. This mostly happens when an array of visible objects is being updated. For example, suppose there is an array of strings that are visible in a view. When a string is updated, a notification is send to the view to update itself. But when the entire array must be updated, it is not helpful to send a notification for each string, instead I would want to send only a single notification at the end.

Besides, sending a notification without parameters is a bit ugly in Objective-C, in Swift this can be done much nicer by encapsulating the notification in an object of its own.

Both the above issues have lead me to implement the following "MergeableNotification" class:

struct MergeableNotification {
    
    private var suspendLevel = 0
    
    private var notificationNeeded = false
      
    private var notificationName: String
    private unowned var notificationSourceObject: AnyObject
        
    mutating func post() {
        
        if suspendLevel == 0 {
            
            NSNotificationCenter.defaultCenter().postNotificationName(notificationName, object: notificationSourceObject)
        
        } else {
        
            notificationNeeded = true
        }
    }
        
    mutating func merge(closure: () -> () ) {
        suspendLevel++
        closure()
        suspendLevel--
        if suspendLevel == 0 && notificationNeeded {
            NSNotificationCenter.defaultCenter().postNotificationName(notificationName, object: notificationSourceObject)
            notificationNeeded = false
        }
    }
        
    init(name: String, sourceObject: AnyObject) {
        self.notificationName = name
        self.notificationSourceObject = sourceObject
    }

}


This class is used as follows:

Defining a filtered notification


let LINE_UPDATED_NOTIFICATION = "LineUpdatedNotification"

class DataModel {

    var lineUpdatedNotification: MergeableNotification!
    
    init() {
        lineUpdatedNotification = MergeableNotification(name: LINE_UPDATED_NOTIFICATION, sourceObject: self)
    }

    ... more
}

If the object sending the notification is self, then we have to define the notification as forced unwrapped and initialise it in the initialiser.

Posting a notification


This is easy:

    func removeCharacterAt(index: Int) {

        ... more

        lineUpdatedNotification.post()
    }

Merging notifications to prevent a notification storm


This may be a bit unusual if you (like me) are not used to functional programming. The code that can raise notifications is called from within a closure. All the notifications that would be raised in the closure are merged into a single notification that will be fired when the closure end, IF that closure is the top-level closure. I.e. if the call to "merge" is nested, then the inner closures will NOT fire a notification when they terminate.

func moveToLeftEndOfLine() {
    
    lineUpdatedNotification.merge(
        {
            [unowned self] in
            
            self.removeInsertionPoints()
            self.removeSelections()
            self.addInsertionPoint(self.line.startIndex)
        }
    )
}

Note that this implementation is not thread safe. But as long as the calls to "merge" are made from within the same thread, even when nested, this should work fine.

Initially I wanted to use a push-pop approach for the nesting of calls to "merge". But that approach has two distinct problems:
1) push and pop are two calls, forget one and you are in trouble. But that trouble could hide itself until the app was in the user's hands.
2) push and pop would need to be called from the same ident level in the code as the code in between. That makes it hard to spot where to start and end the merging.
Using a closure neatly avoids those two problems. And though it necessitates the need to quote 'self' I find that less troubling that the two above problems.

Happy coding...

Did this help?, then please help out a small independent.
If you decide that you want to make a small donation, you can do so by clicking this
link: a cup of coffee ($2) or use the popup on the right hand side for different amounts.
Payments will be processed by PayPal, receiver will be sales at balancingrock dot nl
Bitcoins will be gladly accepted at: 1GacSREBxPy1yskLMc9de2nofNv2SNdwqH

We don't get the world we wish for... we get the world we pay for.