This is not an introduction into Core Data, I assume that you are familiar with the basic principles behind Core Data.
This example is only intended as a starting point: i.e. it will do only the basic setup such that you can actually start experimenting with the bindings and implement the features you really need.
The window that will be created looks like this:
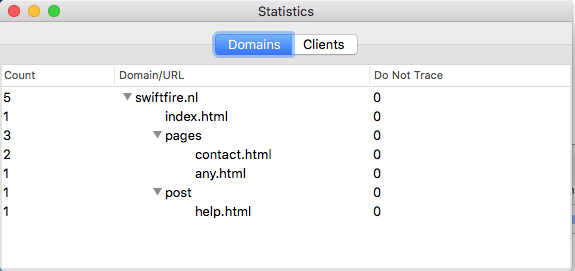
And the "Clients" tab will look like this:

Of course we also need a data model. This is (the relevant part of) the data model that I use:
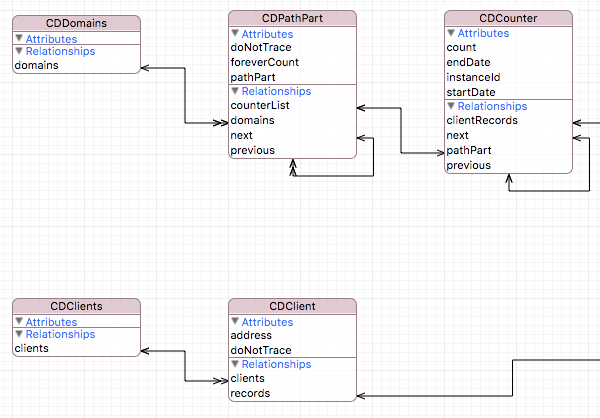
Actually, the CDDomains and CDClients objects are entry points for my code, they are not necessary for this example. Also the CDCounter will not be used. The CDClient will be displayed in the Client tableview and the CDPathParts will be displayed in the Domains outline view.
The first thing to do is to create the window. I made a new nib file for it in which everything is contained. The layout is pretty much standard, it looks as follows (the controllers are already added!):
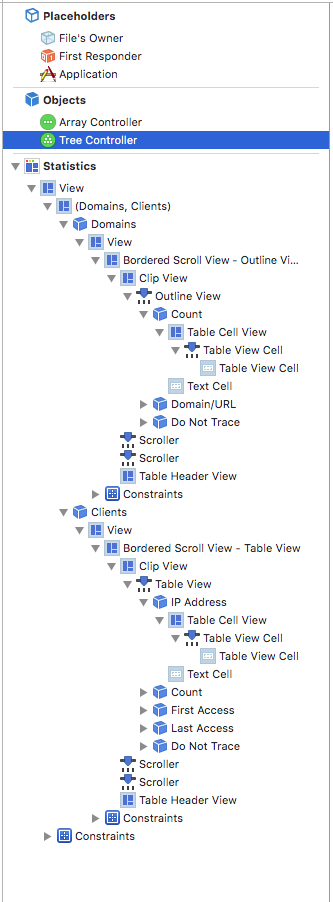
The things to notice in the above image are the following:
An Array Controller and a Tree Controller are used to fetch data from the data model context.
The Array Controller is used for the "Clients" tab (which contains a simple table) and the Tree Controller for the "Domains" tab (which contains an outline view).
We need to connect the Array Controller and the Tree Controller to our data model context.
The Array Controller must fetch the objects of the type "CDClient". To do so, select the Array Controller:

and then open the "Bindings Inspector":
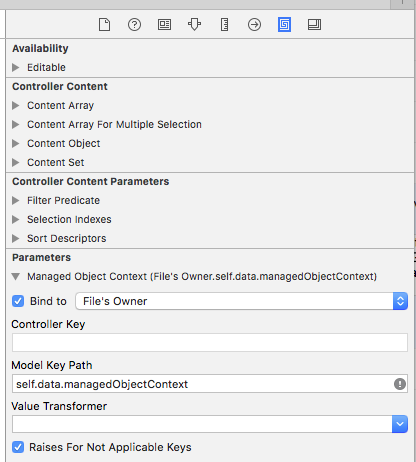
Do not use the "Controller Content" but instead use the "Parameters" and create a binding to the managed object context. As you can see mine is located in the "File's Owner.data.managedObjectContext". The File's Owner is the Window Controller that loads the nib file.
Now switch to the "Attributes inspector":
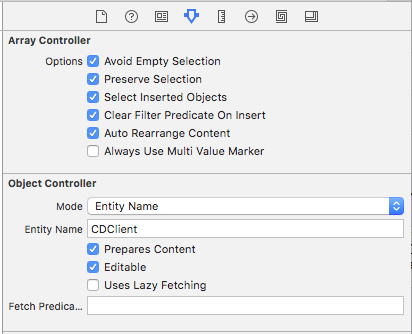
and change the "Mode" from 'Class' to 'Entity Name'. For the "Entity Name" use the class name of the Core Data Model class that must be displayed. In my case this is 'CDClient' (as you can see above in the data model). I also ticked the boxes "Auto Rearrange Content" and "Prepares Content". (Now that I am writing this, I do not believe that auto-rearrange is necessary, but you will need prepares-content. Anyway you can quickly find that out yourself...)
The rest of the bindings for the table follow the standard (which I have blogged about before) and I will only show here the images that I used without further comment:

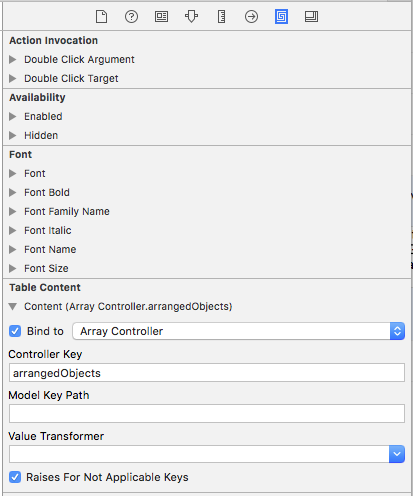
and:
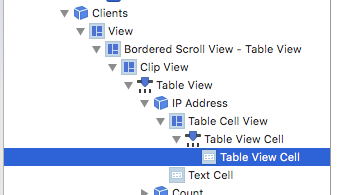
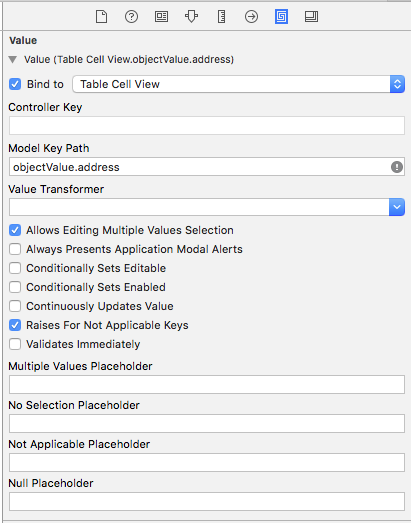
Now on to the outline view. This one follows -of course- similar lines as for the array controller. First we bind the Tree Controller to our data model context:
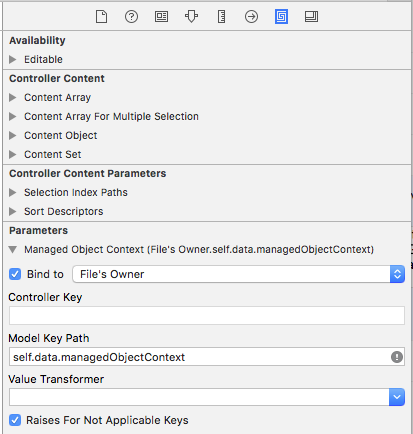
No surprises here, its exactly the same as for the array controller. But the attributes inspector settings are different:
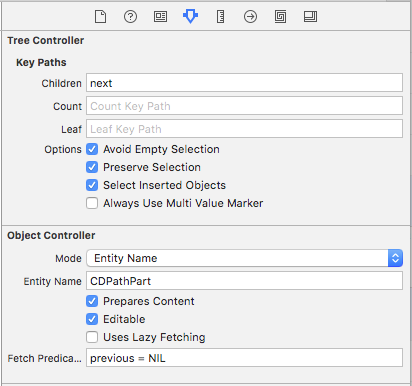
This is more interesting: First off, here too we specify an entity name, but this time it is CDPathPart. Again we tick off the "Prepares Content" box. However for the Clients we did not need a fetch predicate because we wanted to retrieve all Client objects. Here however I want to restrict the Path Parts to the top level path parts only. The others are displayed in the outline hierarchy (as can be seen in the first image). The path parts are connected via an optional "next" and "previous" relationship:
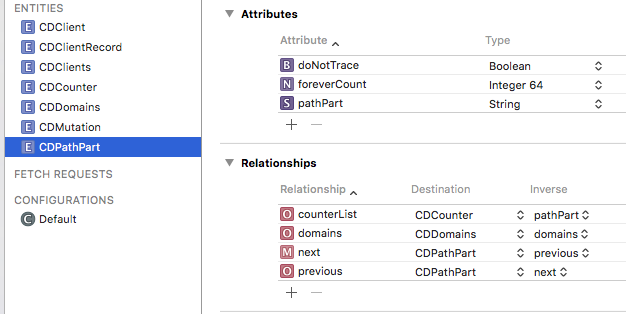
Only when the "previous" relationship is 'nil' is the path part a top level object. Thus the fetch predicate is simple enough: "previous = NIL".
Also note the setting for "Children" in the attributes. That is et to the "next" relationship. This ensures that when "next" is non-nil the outline view will show a disclosure triangle in front of the text.
That is all we "need to know" to be able to start experimenting. Of course the items in the outline view need to be connected to the tree controller. But -again- that is identical to the already shown connections tot the Array Controller.
As I said before, this is not an exhaustive example, it should be just enough to get you going. If not, please tell me what I missed -or what you needed. Either in the comments below or using the form on the right hand side.
Btw: this code will become part of Swiftfire@Github (look for version 0.10.6) and can be downloaded from there.
Happy coding...
Did this help?, then please help out a small independent.
If you decide that you want to make a small donation, you can do so by clicking this
link: a cup of coffee ($2) or use the popup on the right hand side for different amounts.
Payments will be processed by PayPal, receiver will be sales at balancingrock dot nl
Bitcoins will be gladly accepted at: 1GacSREBxPy1yskLMc9de2nofNv2SNdwqH
We don't get the world we wish for... we get the world we pay for.
can be downloaded from there (that could take a few days though)
ReplyDeletewhere is the source
Thanks, link is fixed.
ReplyDeleteit's very interesting it's the only example I found in swift
ReplyDeletewhere is the link ??
ReplyDeleteIt's at the github site in full: https://github.com/Balancingrock/Swiftfire
DeleteI can image why... it's a lot of work to put this together ;-)
ReplyDeleteNow that come to think about it, I am currently in the process of rewriting this bit of code. In fact, the code of swiftfire has already changed substantially from the above example. In order to see the code, you will have to download version 0.10.6
sorry I can not understand well between swiftfire and the tutorial above
ReplyDeletethere is something that escapes me
I used 0.10.6
I do not see the link the tutorial inside
Hmm, seems that you are out of luck.
ReplyDeleteI just checked again, and it seems as if the older version are incomplete. I wonder why... don't know really. But it is almost as if github only shows the files that are still in the current release. For example there should be a directory called "SwiftfireConsole" but I do not see that at all.
Sorry.