Do you need help on a specific subject? Use the contact form (Request a blog entry) on the right hand side.

2016-07-20

Drawing a vertical String | A Swift example using NSAffineTransform

I found the String drawing options out-of-the box a little unsatisfying. I don't need much, but even "not much" necessitates much more in-depth knowledge than I would have hoped for.

Case in point: Drawing a string vertically.

Drawing a String in Cocoa is not that difficult, though it is necessary to map the String onto a NSString:

        (str as NSString).drawAtPoint(NSPoint(x: x, y: y), withAttributes: nil)

Specifying nil for the attributes means that the default attributes will be used. Which is sufficient in most cases.

The NSPoint uses double values for x and y, where (0, 0) is the lower left corner of the view. (Unless "flipped" is overridden to return 'true', then (0, 0) is the upper left corner. "Flipped" also affects the operation of NSAffineTransform, thus the rest of this blog assumes a non-flipped view)

To rotate the string we need to specify a transformation. That is where NSAffineTransform comes in.
For the non-flipped view, a positive rotation is counter-clockwise.

I.e. to achieve this:


we have to specify a rotation of 90 degrees.

Since I have to do this more than once, I wrote a little function for this:

class MyView: NSView {

    static let rotateVertically: NSAffineTransform = {
        let trans = NSAffineTransform()
        trans.rotateByDegrees(90)
        return trans
    }()
    
    private func drawVerticalString(str: String, x: CGFloat, y: CGFloat) {
        let context = NSGraphicsContext.currentContext()!.CGContext
        CGContextSaveGState(context)
        let strRect = (str as NSString).boundingRectWithSize(NSSize(width: frame.height, height: frame.height), options: NSStringDrawingOptions.TruncatesLastVisibleLine, attributes: nil, context: nil)
        let nx = y
        let ny = -x - (strRect.size.height / 2)
        MyView.rotateVertically.concat()
        (str as NSString).drawAtPoint(NSPoint(x: nx, y: ny), withAttributes: nil)
        CGContextRestoreGState(context)

    }

I created a static transformation for this, as I will need that again and again. I do not know how much overhead creating a transformation incurs, so that may be unnecessary.

There are three things to keep in mind for the above implementation:

1) The transformation changes the graphics context permanently (at least for the duration of the "drawRect" call). Hence the operation needs to "push" and "pop" the graphic context so as not to affect other drawing operations that might come after.

2) We must apply a reverse transformation on the coordinates before calling the drawing operation itself. That way the drawing ends up in the proper place. It is of course also possible to do that transformation by using the translate operation of the NSAffineTransform object. However that would mean that the transformation would need to be different for each invocation which kind-of messes with the static definition. But your milage may differ.

3) The "- (strRect.size.height / 2)" was added to let the string rotate around the middle of the "height" (which becomes the "width" afterwards). This is because I calculate the mid-point for the string, not its corner point. Again, your milage may differ.

PS: In Swift 3 the context operations will become much more readable... the principles should remain the same though.

Happy coding...

Did this help?, then please help out a small independent.
If you decide that you want to make a small donation, you can do so by clicking this
link: a cup of coffee ($2) or use the popup on the right hand side for different amounts.
Payments will be processed by PayPal, receiver will be sales at balancingrock dot nl
Bitcoins will be gladly accepted at: 1GacSREBxPy1yskLMc9de2nofNv2SNdwqH

We don't get the world we wish for... we get the world we pay for.

2016-07-16

NSDate, NSTimeInterval, UNIX time and Java Date | Timestamps in OS-X

Back in 1970 things were simple; hardly any computers around...
Then time started... computers arrived.
Computers, being what they are, need time...
And so the troubles started.

First there was UNIX Time. It was measured in seconds, and started in the year zero: 1 Jan 1970.
Since you can store a lot in 32 bit, and since memory was expensive, there was a consensus that 32 would be more than enough to store all the seconds you need.
Turns out, they were wrong.

So here we are today, with a baffling array of solutions. Since this blog is about Swift, its about MacOS (Unix) and iOS. Even so, we still need to interact with the world at large, so the most common time formats are still of interest.

The following are the most common:

NSDate: An internal representation of a moment in time, used in MacOS, iOS, tvOS and watchOS.

NSTimeInterval: A double value that is used to express the time elapsed between two moments in time. Commonly used to store the time between 1 Jan 1970 and another moment. It thus can be confused with Unix Time and Java Date.

Unix Time: Started out as a 32 unsigned integer that represents the number of seconds since 1 Jan 1970. Today all modern Unixes use a 64 bit unsigned integer. Due to the large size, it can safely be used (converted into) a singed integer 64 for just about all cases. This will fail sometime in the future, but I have not even bothered to calculate how far in the the future that is (probably after the sun stops shining...).

Java Date: This too measures the time since 1 Jan 1970, but counts in milli-seconds. It is thus 1000 x as large as the Unix Time. Still, it can be safely encapsulated in a signed 64 bit integer for most practical purposes.

Personally, I find it a bit disappointing that NSTimeInterval uses a double. I would have preferred an integer, 64 bit of course. While I can understand why Apple has done this it also makes comparing on equality difficult. (Remember: never compare a double (or float) on equality!). And though modern processors will do a pretty quick job on double compare, an integer compare is often faster.

If we have to exchange time information between applications and computers, the question is which representation do we use?

Simply defaulting to the standard of the system at hand can easily be the wrong answer. I would suggest to make a conscious choice. That could save a lot of hassle later on. (It's usually not a good day when you find out that you have to refactor all of your code -and tests- because you need to interface with another party that uses a different system...). Having said this, the safest choice is IMO the Java Date. It won't always be the right choice, but if offers a resolution that is high enough in most cases (when you need nano-second resolution, do a google on "timespec") and can be represented in a 64 bit integer.

In Swift it makes sense to create an extension for this. And while we are at it, we can include the conversions for the Unix time as well:

extension NSDate {
       

    /// Milli seconds since 1 Jan 1970
    
    var javaDate: Int64 {
        return Int64(self.timeIntervalSince1970 * 1000)
    }
    
    
    /// Seconds since 1 Jan 1970
    
    var unixTime: Int64 {
        return Int64(self.timeIntervalSince1970)
    }
    
    
    /// From milli seconds since 1 Jan 1970
    
    static func fromJavaDate(value: Int64) -> NSDate {
        return NSDate(timeIntervalSince1970: Double(value / 1000))
    }
    
    
    /// From seconds since 1 Jan 1970
    
    static func fromUnixTime(value: Int64) -> NSDate {
        return NSDate(timeIntervalSince1970: Double(value))
    }
}

Happy coding...
Did this help?, then please help out a small independent.
If you decide that you want to make a small donation, you can do so by clicking this
link: a cup of coffee ($2) or use the popup on the right hand side for different amounts.
Payments will be processed by PayPal, receiver will be sales at balancingrock dot nl
Bitcoins will be gladly accepted at: 1GacSREBxPy1yskLMc9de2nofNv2SNdwqH

We don't get the world we wish for... we get the world we pay for.
2016-07-12

VJson release v0.9.8 | A Single Class JSON Hierarchy in Swift

I have released a new version of VJson, a JSON hierarchy that can be used to create and parse JSON code.

Yet another JSON parser? Yes.

For some reasons I needed to own the sources that could be used to create JSON code and to parse JSON code. A simple way to achieve this is to write your own...

It also has the advantage that I get to decide how the interface looks. And that is quite important to me. Usage should be easy. And I believe I have achieved just that. I have not studied other implementations, and I am sure there are (many?) similar solutions "out there".

So how easy is it?

For starters, it consists of a single class: VJson. Of course a VJson object can contain other VJson objects. And then, wel, there is parsing:

let json = try VJson.parse(sourceData)

Where source-data can be a String, a (file)URL, NSMutableData or a buffer. Sometimes with additional parameters. There is of course also a non-throwing alternative (with an extra parameter).

Then there is creation of JSON code:

let json = VJson()
print(json.description) // Prints "{}", i.e an empty JSON code.

Adding values to the JSON hierarchy:

json["Test"] &= true   // Code = {"Test":true}
json["Another"] &= 13  // Code = {"Test":true,"Another":13}

Note that the subscript accessor actually creates the JSON code parts that are needed to fulfil the whole request. Thus it is possible to create a fully formed JSON hierarchy in two lines:

let json = VJson()
json["Books"][2]["available"] &= true

Creates the JSON code {"Books":[null,null,{"available":true}]}
Notice how two "null" items have been automatically inserted to fulfil the array subscript accessor.

Having the subscript accessors create the items as necessary makes them impossible to use for testing of items if you do not want to change the JSON hierarchy for non-existing items. For that purpose the UNIX pipe symbol is used:

To test if book number 23 exists:

if json|"Books"|23 != nil { ... }

Or in a guard statement:

guard let title = (json|"Books"|23|"title")?.stringValue else { ... }

Iteration is also possible:

for item in json {...}

This will iterate the children of OBJECT and ARRAY JSON items.

The "name" (i.e. the tag in a JSON OBJECT used to identify a child item) is available as the "nameValue" of an item. Thus when iterating an OBJECT the name can be read by:


for item in json {
    let name = item.nameValue
}

Items contained in an array may have a name as well, however these names will not be part of the generated code.

VJson uses 'null' as a substitute for 'nil'. Assigning an optional to an item will generate the value 'null' if that optional is nil. Example:


let json = VJson()
var title: String?
json["Title"] &= title // Code = {"Title":null}

It is often possible to convert values. I.e. you could read a number as a string, or certain strings as booleans. For those situations VJson offers the "as...." accessors.

let json = try VJson.parse("{\"label\":true}")
let labelIsTrue = (json|"label")?.asBool

And lastly, how to chain a complex type into generating a representative JSON code:

class Inner {
    var a: Int?
    var json: VJson {
        let j = VJson()
        j["A"] &= a
        return j
    }
}

class Outer {
    var b = Inner()
    var c: String?
    var json: VJson {
        let j = VJson()
        j["C"] &= c
        j.add(b.json, forName: "B")
        return j
    }
}

let k = Outer()

print(k.json)

This is the way I do it, but other ways are possible of course. In defence of the present method: It keeps information where it should be (I.e. the name of the Inner item is part of the Outer item) and creates a clear distinction between local properties that do not have an internal structure and properties that have a bested structure.
You can download VJson from Github.

Happy coding...

Did this help?, then please help out a small independent.
If you decide that you want to make a small donation, you can do so by clicking this
link: a cup of coffee ($2) or use the popup on the right hand side for different amounts.
Payments will be processed by PayPal, receiver will be sales at balancingrock dot nl
Bitcoins will be gladly accepted at: 1GacSREBxPy1yskLMc9de2nofNv2SNdwqH

We don't get the world we wish for... we get the world we pay for.
2016-06-30

Binding Core Data objects to a GUI in OS-X

This example will show how to connect a TableView and an OutlineView to a managed object context containing core data objects.

This is not an introduction into Core Data, I assume that you are familiar with the basic principles behind Core Data.

This example is only intended as a starting point: i.e. it will do only the basic setup such that you can actually start experimenting with the bindings and implement the features you really need.

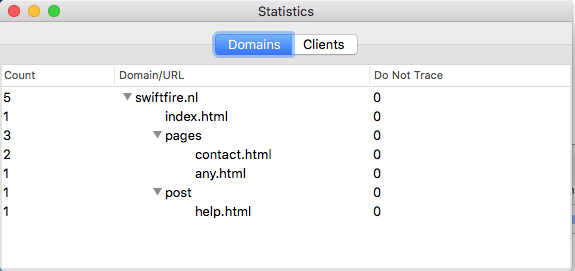
The window that will be created looks like this:


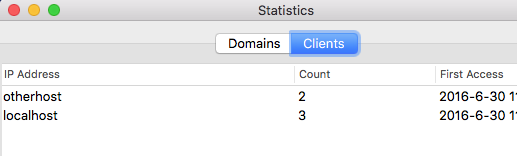
And the "Clients" tab will look like this:


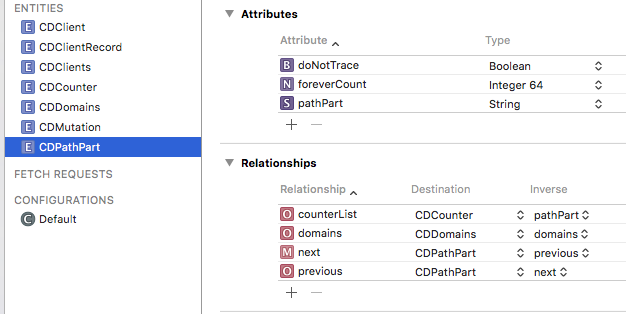
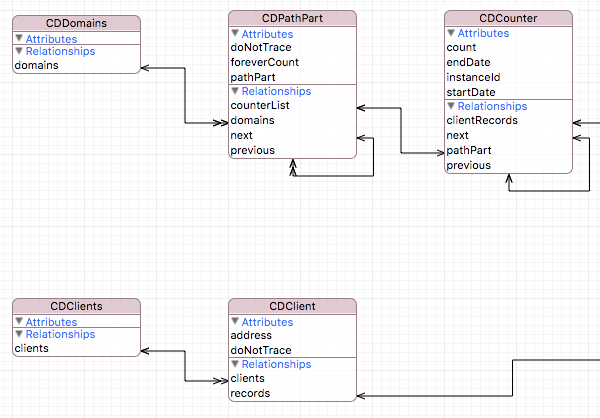
Of course we also need a data model. This is (the relevant part of) the data model that I use:


Actually, the CDDomains and CDClients objects are entry points for my code, they are not necessary for this example. Also the CDCounter will not be used. The CDClient will be displayed in the Client tableview and the CDPathParts will be displayed in the Domains outline view.

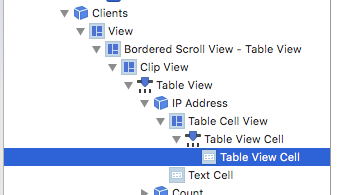
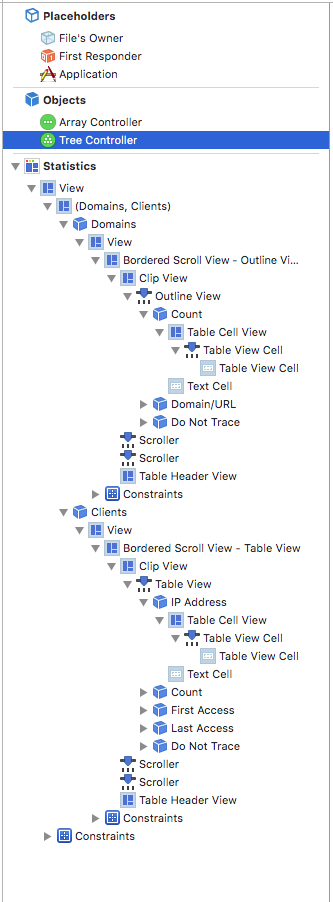
The first thing to do is to create the window. I made a new nib file for it in which everything is contained. The layout is pretty much standard, it looks as follows (the controllers are already added!):


The things to notice in the above image are the following:

An Array Controller and a Tree Controller are used to fetch data from the data model context.
The Array Controller is used for the "Clients" tab (which contains a simple table) and the Tree Controller for the "Domains" tab (which contains an outline view).

We need to connect the Array Controller and the Tree Controller to our data model context.

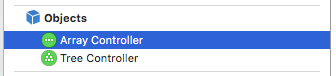
The Array Controller must fetch the objects of the type "CDClient". To do so, select the Array Controller:


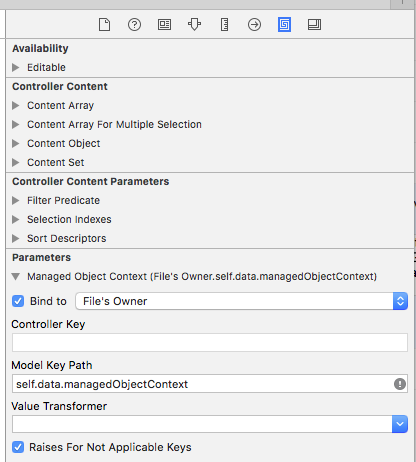
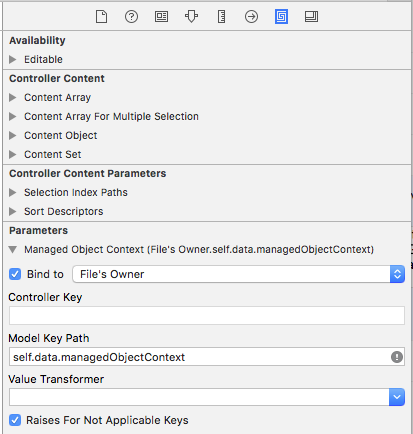
and then open the "Bindings Inspector":


Do not use the "Controller Content" but instead use the "Parameters" and create a binding to the managed object context. As you can see mine is located in the "File's Owner.data.managedObjectContext". The File's Owner is the Window Controller that loads the nib file.

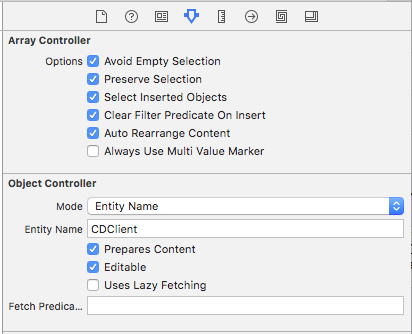
Now switch to the "Attributes inspector":


and change the "Mode" from 'Class' to 'Entity Name'. For the "Entity Name" use the class name of the Core Data Model class that must be displayed. In my case this is 'CDClient' (as you can see above in the data model). I also ticked the boxes "Auto Rearrange Content" and "Prepares Content". (Now that I am writing this, I do not believe that auto-rearrange is necessary, but you will need prepares-content. Anyway you can quickly find that out yourself...)

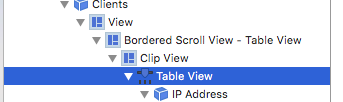
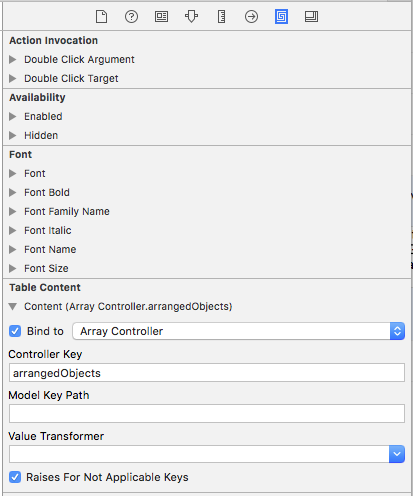
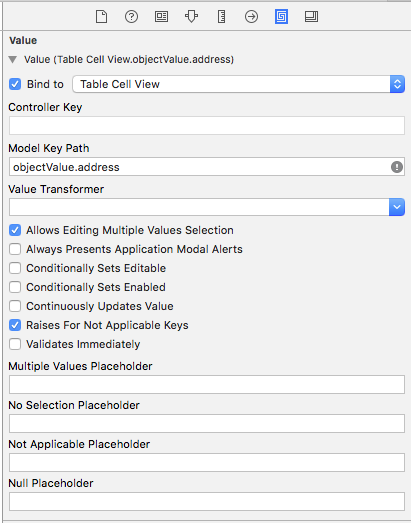
The rest of the bindings for the table follow the standard (which I have blogged about before) and I will only show here the images that I used without further comment:


and:


Now on to the outline view. This one follows -of course- similar lines as for the array controller. First we bind the Tree Controller to our data model context:


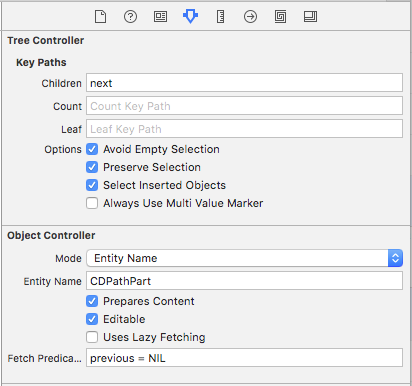
No surprises here, its exactly the same as for the array controller. But the attributes inspector settings are different:


This is more interesting: First off, here too we specify an entity name, but this time it is CDPathPart. Again we tick off the "Prepares Content" box. However for the Clients we did not need a fetch predicate because we wanted to retrieve all Client objects. Here however I want to restrict the Path Parts to the top level path parts only. The others are displayed in the outline hierarchy (as can be seen in the first image). The path parts are connected via an optional "next" and "previous" relationship:


Only when the "previous" relationship is 'nil' is the path part a top level object. Thus the fetch predicate is simple enough: "previous = NIL".

Also note the setting for "Children" in the attributes. That is et to the "next" relationship. This ensures that when "next" is non-nil the outline view will show a disclosure triangle in front of the text.

That is all we "need to know" to be able to start experimenting. Of course the items in the outline view need to be connected to the tree controller. But -again- that is identical to the already shown connections tot the Array Controller.

As I said before, this is not an exhaustive example, it should be just enough to get you going. If not, please tell me what I missed -or what you needed. Either in the comments below or using the form on the right hand side.

Btw: this code will become part of Swiftfire@Github (look for version 0.10.6) and can be downloaded from there.

Happy coding...

Did this help?, then please help out a small independent.
If you decide that you want to make a small donation, you can do so by clicking this
link: a cup of coffee ($2) or use the popup on the right hand side for different amounts.
Payments will be processed by PayPal, receiver will be sales at balancingrock dot nl
Bitcoins will be gladly accepted at: 1GacSREBxPy1yskLMc9de2nofNv2SNdwqH

We don't get the world we wish for... we get the world we pay for.
2016-06-26

Creating a unique number for a NSManagedObject | A simple algorithm in Swift

Sometimes I want to create a unique number. There are many ways to do just that, and we probably all have our preferences for one way or the other.

Recently I needed to identify an NSManagedObject in a unique way that would persist across application invocations and that should offer high performance when used in comparisons.

That pretty much ruled out a UUID. A UUID is almost guaranteed unique, but since it is string based, comparing two UUIDs also could be slow.

A 64 bit integer compare is probably the fastest way to compare anything, so how to create a unique 64 bit integer?

Specific for the purpose in question (a NSManagedObject subclass) the question is: How many unique identifiers are necessary? In my case, a million per app run should be more than enough. Even though the app is designed to run months at a time, it is extremely unlikely that more than a couple of hundred -or maybe even a few thousand- objects will be created. So a million should be (much) more than enough.

An easy way to create a unique instance number is to create a static counter. And each time an instance is created the static counter is increased and its value copied to the unique id. However that would not persist well. To persist this number and still be unique on the next App start, we would need some extra code to read the number of the already present objects in the core data store. If there are a lot, then timing is an issue. And of course the (un)necessary code.

This can be done easier if we were to start the static counter from a value that is derived from the current moment in time. Since all those moments are different from each other, we only need to ensure that there won't be an overlap due to the number of objects created.

The following algorithm does that just nicely:

class CDCounter: NSManagedObject {

    private static var queue = dispatch_queue_create("nl.balancingrock.swiftfire.cdcounter", DISPATCH_QUEUE_SERIAL)

    private static var instanceCounter: Int64 = {
        return Int64(NSDate().timeIntervalSince1970) * 1_000_000
    }()
    
    override func awakeFromInsert() {
        
        dispatch_sync(CDCounter.queue, { [unowned self] in
            self.instanceId = CDCounter.instanceCounter
            CDCounter.instanceCounter += 1
        })
    }
}

The instance counter is created after program start once the first object is created. (It's a lazy variable) After that the value is incremented by 1 for each object created.

Btw: "instanceId" is a property defined in the core data model.

As long as less than 1 million objects are instantiated in a single app run, this approach is both efficient and easy to create.

Note that the initialisation of the property is done in "awakeFromInsert()" which is called only when an object is inserted into a context. Thus only once for each object.

Also note that the assignment and increment of the static variable is done in a dispatch call to ensure that multi-threading will not create duplicates. (Using Darwin.OSAtomicIncrement64 is not enough, we also must protect the time between the assignment and the increment.)

The queue that is used is used only for the assignment/increment operation. It is of course possible to use a different queue in your app to do this, as long as you are aware that the "sync" operation called on the queue can potentially lead to deadlocks. Keeping the queue private avoids this.

Can the Int64 handle the huge numbers? Yes. For the year 3000 the initialization value of the instanceCounter is 3.2*10^16. An Int64 can contain positive numbers up to 2^63 = 9.2*10^18. Thus there is even room to up the ante on the million objects per app-run.

Happy coding...

Did this help?, then please help out a small independent.
If you decide that you want to make a small donation, you can do so by clicking this
link: a cup of coffee ($2) or use the popup on the right hand side for different amounts.
Payments will be processed by PayPal, receiver will be sales at balancingrock dot nl
Bitcoins will be gladly accepted at: 1GacSREBxPy1yskLMc9de2nofNv2SNdwqH

We don't get the world we wish for... we get the world we pay for.
2016-06-24

Nil coalescing assignment | A nifty Swift addition

Just a little thing, but then again its the little things that can make life worth while.... especially as a programmer.

So, how often do you find yourself writing code like:

if str == nil { str = "Some text" }

Or the slightly better looking:

str = str ?? "Some text"

But I think it should be still shorter, what about:

str ??= "Some text"


Well, turns out that is quite possible in Swift with the following:

infix operator ??= {}

func ??=<T> (inout lhs: T?, rhs: T) {
    if lhs == nil { lhs = rhs }

}

Just include the above lines in your project, and you're set.

Happy coding...

Did this help?, then please help out a small independent.
If you decide that you want to make a small donation, you can do so by clicking this
link: a cup of coffee ($2) or use the popup on the right hand side for different amounts.
Payments will be processed by PayPal, receiver will be sales at balancingrock dot nl
Bitcoins will be gladly accepted at: 1GacSREBxPy1yskLMc9de2nofNv2SNdwqH

We don't get the world we wish for... we get the world we pay for.
2016-06-23

Using a datamodel with multiple targets

Recently I stumbled across a problem where I wanted to use a single datamodel for two targets.

While the first target had successfully used a datamodel, when I added the model to a second target I went through a succession of error messages:

+entityForName: could not locate an entity named 'SwiftfireStatistics.CDClients' in this model.

CoreData: warning: Unable to load class named 'Swiftfire.CDClients' for entity 'CDClients'

NSFetchRequest could not locate an NSEntityDescription for entity name 'SwiftfireStatistics.CDClients'

The problem seemed hard to pin down, and was badly reproducible. WTH was going on? While there was an answer on StackOverflow that helped, (adding @objC(<name>)) it was not satisfactory and I wanted to know what the underlying problems was.

I learned quite a bit about how a datamodel works and how namespaces are used, but in the end the solutions was as simple as unsatisfactory:

In the operations

let fetchRequest = NSFetchRequest(entityName: CDClients.className())

and

NSEntityDescription.insertNewObjectForEntityForName(CDClients.className(), inManagedObjectContext: self.managedObjectContext) as! CDClients

I was simply trying to be too clever for my own good.

The usage of CDClients.className() turned out to be the culprit. A class name has a namespace added in front. Thus the className() of a core data class CDClients in the target SwiftfireStatistics is in full "SwiftfireStatistics.CDClients".

What the core data functions really want is the class name without the preceding namespace:

let fetchRequest = NSFetchRequest(entityName: "CDClients")
NSEntityDescription.insertNewObjectForEntityForName("CDClients", inManagedObjectContext: self.managedObjectContext) as! CDClients

I don't like that, but it is the way it is. We could introduce a "name" property of type string and use that property instead, but...

Oh well, its the way it is.

Happy coding...

PS: You may also be interested in "Moving a datamodel from one project to another"

Did this help?, then please help out a small independent.
If you decide that you want to make a small donation, you can do so by clicking this
link: a cup of coffee ($2) or use the popup on the right hand side for different amounts.
Payments will be processed by PayPal, receiver will be sales at balancingrock dot nl
Bitcoins will be gladly accepted at: 1GacSREBxPy1yskLMc9de2nofNv2SNdwqH

We don't get the world we wish for... we get the world we pay for.